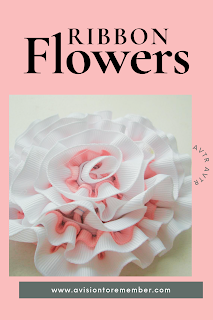
Rosette Fabric Flowers from Scrap Material


In a world where sustainability and creativity go hand in hand, finding ways to repurpose scrap materials has become an exciting and rewarding endeavor. If you have a collection of fabric scraps lying around, gathering dust in a corner, why not transform them into stunning rosette fabric flowers? These exquisite blooms are not only eco-friendly, but they also add a touch of elegance to any accessory, garment, or home decor item.

Whether you're an avid crafter or simply looking for a fun and budget-friendly project, this step-by-step guide will take you through the process of creating your very own rosette fabric flowers. By upcycling these humble remnants, you'll give them a new lease of life while expressing your personal style and unleashing your creative flair. So gather your scrap materials, prepare your tools, and let's dive into the world of rosette fabric flower making!

 Ingredients:

  • pieces of scrap fabric about 2 inches wide. I used a lot of flannel and that made the flower thicker. If you are using more thin cotton fabrics then I would double them up. You will need enough fabric to make a 50 inch strip. A 50 inch strip of fabric will make a flower that is approximately 4 inches wide.
  • Hot glue gun
  • sewing machine or needle and thread
  • hair clip or pin for attaching the flower to

How to make Rosette Fabric Flowers from Scrap Material:

  1. Gather your fabric scraps or cut your fabric into strips. I used several different colors, but if you want the same color then you could cut a strip of fabric 2 inches by the width of your fabric. If you fabric is 45 inches then I would not worry about adding the extra 5 inches to it. Notice that my pieces of fabrics are not all the same width, some were a little wider and some were a little smaller. Remember it is a scrappy flower. Each of my scraps are anywhere between 4 inches long and 12 inches long. The ones that were longer than that I cut in half. If you are using cotton then I would double your fabric up for this part or use fabric that is 4 inches wide instead of 
  2. Sew the pieces of fabric together with right sides facing each other
  3. Continue to sew the pieces of fabric together until you have a long piece of fabric that is about 50 inches long. 
  4. Now take your long strip of fabric and fold it in half or roll it into a tub. It might be easier for you to put a small drop/line of glue along one edge of the strip to hold the fold/roll into place
  5. Roll the fabric strip onto itself. Imagine making a cinnamon roll. As you are rolling the fabric onto itself add a little glue here and there to hold the flower into place. You could even do a thin line of hot glue to make sure that it stays in place.
  6. Continue rolling until you get to then end of your fabric. With the last inch of the fabric strip roll it under tha last row that you made. Tuck the end into there so that it is hidden. Put a little dab of glue in there to hold it into place

  7. The possibilities are endless for what you can use this flower on.
    1. sew it onto your clothing for an accessory
    2. attach it to a purse, shoes, or other item of clothing
    3. glue a hair clip onto it and clip it into your hair
    4. attach it to a pin for a corsage
    5. Attach to a headband.

Make sure to check out all of the fabric flower tutorials we have here including the below: 


Image HTML map generator

Selvage Edge Scraps Flowers Tutorial

Are you tired of throwing away the selvage edge fabric pieces from your sewing projects? Well, here's a fun and easy way to turn them into something beautiful: ruffled flowers!

This blog post includes affiliate links. Thanks for clicking!
 

To make these flowers, you will need some selvage edge fabric pieces and some elastic. You can use any fabric with a selvage edge, but I recommend using lightweight cotton or linen fabrics for a softer and more delicate look.


Here are the steps to create your own ruffled flowers:

 Ingredients:

30 inches of ¼ inch elastic
50 inches of pieces of scrap fabric that measure between 1/2 inch and 1 inch wide. They don’t have to be one continuous piece. They don’t have to be even, the wavier and different they are the better.
Thread
Hot Glue
Alligator Hair clip (or pin for a corsage)
3/8 inch grosgrain ribbon to cover the hair clip
Small piece of fabric to cover the back of the flower

Directions:

1. sew the fabric scraps to the piece of elastic. Pull the elastic as tight as you can while sewing so that the
fabric bunches/ruffles.


2. After you have sewn the first piece of fabric onto the elastic, continue with the second piece. Do this will all the pieces of fabric. You don’t have to worry about little gaps within the fabric. Don’t even worry about finishing the ends of all the scraps. This is a scrappy flower. It is GOOD when it is messy.
3. Continue until you are either at the end of the elastic or you have used all your fabric scraps.
4. Take your long piece of scraps and elastic. Put a line of glue onto the elastic and start rolling it onto itself.


5. Put a lot of glue onto the bottom of the flower to secure it into place.
6. Cut a circle the same size as the bottom of the flower and glue it onto the bottom of the flower.
7. Attach your pin or hairclip to the bottom of the flower.

Notes:

To make the flower bigger or smaller, use more or less elastic and ribbon. Just follow the rest of the directions.

And that's it! You now have a beautiful ruffled flower made from selvage edge fabric pieces and elastic. These flowers can be used to embellish clothing, bags, or home decor items, or they can be attached to a hair clip or headband for a fun accessory. Give it a try and see what kind of unique creations you can come up with!

Check out our other scrap flower craft ideas for scrap fabrics 


Image HTML map generator

Memorizing Book of Mormon Scriptures: Mosiah 15:6-7


One of our goals the last couple years is to memorize important scriptures and quote. I’m going to start sharing them in hopes that it might help someone else with their goals and to keep them organized for me

The memorizing sheets include the entire scriptures, some words left out with the first letter remaining, and then the first letter remaining for each word.

I love this set of scriptures because Christ chose to come to this earth knowing that he would die for our sins. But before that would happen, he would perform many miracles for those he loved so much. 

He had been prophesied of throughout the Old Testament, but the most famous prophet to prophesy of his coming to me is Isaiah. He spoke of how he would come and die for us. 

This was quoted by the prophet in Mosiah 15. He talks about how Christ would be led, like a sheep (the sheep and lamb being a symbol of Christ throughout his ministery). He could have stopped what was going on, he could have performed a miracle for himself. Instead he opened not his mouth. He allowed the Atonement and his death to continue.

Why? for us! He did it for us. He also did it because it was the will of the Father. He gave his life for others. 

I hope you enjoy memorizing this sacred scripture as much as I have. 

Mosiah 15:6-7

And after all this, after working many mighty miracles among the children of men, he shall be led, yea, even as Isaiah said, as a sheep before the shearer is dumb, so he opened not his mouth.

7 Yea, even so he shall be led, crucified, and slain, the flesh becoming subject even unto death, the will of the Son being swallowed up in the will of the Father.

First Letter of Each Word of Mosiah 15:6-7

A a a t, a w m m m a t c o m, h s b l, y, e a I s, a a s b t s i d, s h o n h m. 

7 Y, e s h s b l, c, a s, t f b s e u d, t w o t S b s u i t w o t F. 

A screen shot of the memorizing verses in my notes section. Feel free to save the picture or screen shot it for yourself. 


https://drive.google.com/uc?export=view&id=1jmKHcoi3FG7IVAfnSrva7MX8q-zKP66H

We have shared several other things that we are working on memorizing here on our blog. Including the Living Christ, The Proclomation to the Family, The Restoration, and more!

10 One Hour Rag Quilt Patterns

Here are A Vision to Remember, we specialize in rag quilts. Especially making a quilt in an hour. Making a one hour rag quilt can really be done. 


Rag quilts are a popular choice for those looking for a cozy and rustic touch to their home decor. The technique involves using a layer of batting between two layers of fabric and then sewing the layers together with exposed seams that will fray over time. The result is a warm and cuddly quilt with a textured, frayed edge that's perfect for snuggling up with on a chilly day.

If you're looking for some new rag quilt patterns to try, here are ten unique designs that can be completed in just one hour each.

All of the quilt patterns include the following:

  • Instructions for cutting, piecing, and finishing your quilt
  • Hints and Tricks that I have learned along the

Suggested Fabric for the Rag Quilt Patterns:

  • Cotton
  • Flannel
  • Minky
  • Chenille

Apron Pattern for Women & Children

The rag apron is the perfect gift to create for your friend, mom, sister, aunt, or anyone that loves to be in the kitchen while still being stylish
 

Ashlyn Rag Quilt Pattern

The pattern is easy to sew and a great blanket for the beginner. It can be whipped up in just a few hours. Also, not pictured will be the instructions for making the blanket larger for crib size or basically any size you would like.


Disappearing 9 Square Rag Quilt Pattern


 The pattern is easy to sew and a great blanket for the beginner. It can be whipped up in just a few hours.

Patriotic Quilt Pattern - Flag Rag Quilt

Includes instructions on how to make the throw size quilt.


Pinwheel Rag Quilt Pattern


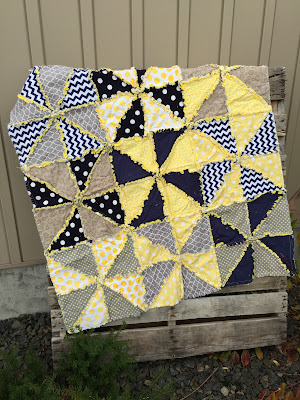
 Pinwheel Quilt Pattern for Baby is a quick and easy quilt pattern for any level of expertise. Beginner to advance. Complete your rag quilt in as little as an afternoon with our fun and simple pattern

Strip Rag Quilt Pattern


  The strip Rag Quilt Pattern for a throw size quilt and easy to sew and simple to follow.

Triangle Rag Quilt Pattern 


 The pattern is easy to sew and a great blanket for the beginner. It can be whipped up in just a few hours. Also, not pictured will be the instructions for making the blanket larger for crib size or basically any size you would like.

Around the World Rag Quilt Pattern


 Around the World Rag Quilt Pattern for Baby is a fun quilt to create for a baby shower gift, for your own little new one on its way, or to even create a queen size quilt. It is easy to sew and simple to follow.

Addy Mae Rag Quilt Pattern


 Addy Mae Rag Quilt Pattern for Baby Car Seat Cover to sew a great baby shower gift for a boy or a girl. The pattern can be used as a blanket or a carseat cover.  It is a great way to keep your baby germ free,

Diaper Bag Pattern Rag Quilt Style


 Diaper Bag Pattern Rag Quilt Style. The bag you create from the Instant Download PDF Pattern Instructions will be oversized, with pockets, and perfect!

BONUS: Butterfly Applique Rag Quilt Pattern


This Butterfly Applique Quilt Pattern - Instant Download blanket is so easy to sew and a great blanket for the beginner. It can be whipped up in just a few hours. This is one of my favorite patterns to sew because I can use the same basic building block in this quilt to make anything from a doll quilt to a kind size quilt and everything in between.

Make sure to check out all of the rag quilt pattern ideas we have here on our blog!


  Image HTML map generator

Subscribe

Enter your email address:

Delivered by FeedBurner

Let's Get Social

Image HTML map generator


Featured Post

How to Memorize The Living Christ - Simple and Easy