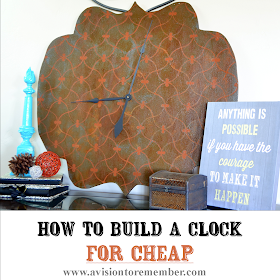
Finally got the clock hung up with the cabinet door that I made last month. Loving the color added to my blah beige living room. Next up: curtains and reupholstering a chair. Hopefully I can get it done before baby comes!
Its been awhile ago, but this summer I build this clock completely from scratch. If you would like to see how it was done you can go to HERE. Same thing with the Cabinet Door Makeover and the Super Simple Monogram Wreath
When I first posted about the clock I promised that I would go into a little more detail about how the painting all worked. There were several layers that I did to get the stenciled, weathered look. So here is a quick rundown:
After I had cut the board I primed it, with some primer that I had. The iron paint that I used from Modern Masters is spendy and I didn't want to waste any of it with it soaking into the wood from not being primed.
After the first coat of primer had all dried then I started with the primer that comes in the kit from Modern Masters. The paint kit that I used is the Iron Metal Paint. The primer that comes with it is a burnt orange color, which worked perfect for me because my color scheme is burnt orange and gray in my living room. I did 2 coats of the primer
Next I used a stencil and the Iron Reactive Paint and sponged it on. I didn't want to roll it on because I wanted to see more of the orange coming through. I did 2 coats of this as well.
Lastly I used the iron activator and sponged it on as well. This is the stuff that will do all the chemistry jazz and make your paint job look like it is Iron. So keep in mind the more of it you use, the more it will eat up your paint to make it look like iron. If you don't use very much then not much will get eaten up. I hope that makes sense.
I applied the activator liquid 3 different times. Each time sponging on a little bit at a time, and then waiting for an hour or so, until I saw the effect. Then I would apply it again, a little heavier in spots, and thinner in other spots, until I got the look I was going for.
Ok so if you want more information on how I cut and did all the other stuff you can go HEREIts been awhile ago, but this summer I build this clock completely from scratch. If you would like to see how it was done you can go to HERE. Same thing with the Cabinet Door Makeover and the Super Simple Monogram Wreath
When I first posted about the clock I promised that I would go into a little more detail about how the painting all worked. There were several layers that I did to get the stenciled, weathered look. So here is a quick rundown:
After I had cut the board I primed it, with some primer that I had. The iron paint that I used from Modern Masters is spendy and I didn't want to waste any of it with it soaking into the wood from not being primed.
After the first coat of primer had all dried then I started with the primer that comes in the kit from Modern Masters. The paint kit that I used is the Iron Metal Paint. The primer that comes with it is a burnt orange color, which worked perfect for me because my color scheme is burnt orange and gray in my living room. I did 2 coats of the primer
Next I used a stencil and the Iron Reactive Paint and sponged it on. I didn't want to roll it on because I wanted to see more of the orange coming through. I did 2 coats of this as well.
Lastly I used the iron activator and sponged it on as well. This is the stuff that will do all the chemistry jazz and make your paint job look like it is Iron. So keep in mind the more of it you use, the more it will eat up your paint to make it look like iron. If you don't use very much then not much will get eaten up. I hope that makes sense.
I applied the activator liquid 3 different times. Each time sponging on a little bit at a time, and then waiting for an hour or so, until I saw the effect. Then I would apply it again, a little heavier in spots, and thinner in other spots, until I got the look I was going for.
If you notice in the graphic above there are several different colors. The gray is where I didn't put hardly any (if any at all) of the activator. The darker orange has a little more, and then the light orange (not including the stenciled part) is where a lot of the liquid activator was. It gives you a nice natural look as long as you don't sponge the stuff on in lines or patterns. You want an organic look with it, so make sure to not apply it in lines or patterns.
I hope that helps you when you are using the iron paint. Let me know if you have any questions and I will do my best to answer them!
To find your local Modern Masters retailer, you can use their Retail Locator or their Online Shop…


No comments:
Post a Comment
I love hearing from you! Let me know what you think